Export & import
DbGate has flexible export/import system allowing both simple one-click exports or complex custom setup.
Simple one-click export
If you don’t need any configuration, you just need to export data to file, you could use simple export. There are several ways, how to invoke simple export:
- Table/view/collection context menu, Export
- Table data, “Export” context menu or button. Filters are applied also to exported data
- Query result, “Export” context menu or button
In desktop application, you could directly save exported file.
I web app, exported file is offered for download.
Advanced export/import
If you need to configure more details or export more tables in one stop, you need to use “Advanced export”.
The same configuration tool is used for importing, just wityh exchanged source and target configuration.
Advanced export/import could be invoked from:
- the same places as Simple export, just instead of file format choose “Export advanced…”
- database context menu, choose “Export” or “Import”
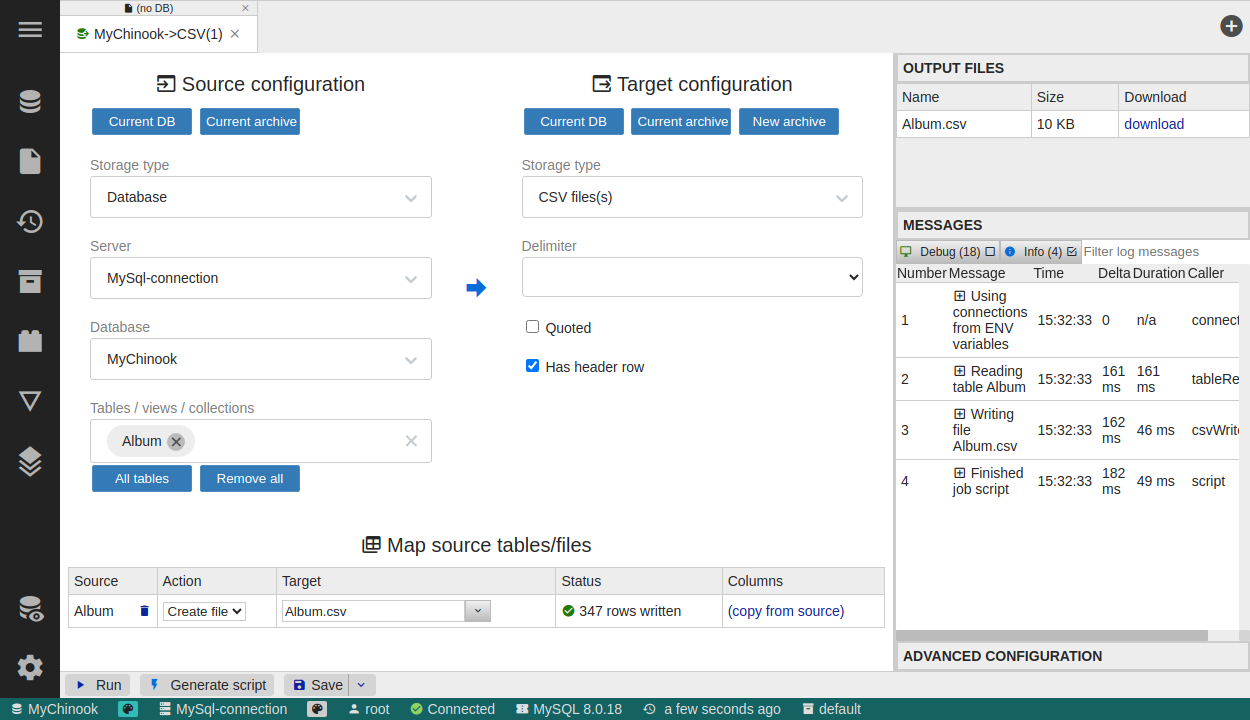
Source configuration
- Storage type - choose source of data
- Database - then you configure “Export”
- Select multiple source tables
- File (JSON, CSV, DBF…) - then you configure “Import”
- Open or drag & drop source file
- Query - in most cases, you will not need this, but you could type query directly here. This option is internally used, when you are exporting eg. filtered table data.
- Archive - import/export data from data archive
- Database - then you configure “Export”
Target configuration
- Storage type - the same as for source configuration, but with opposite meaning
- Database - you configure “Import”
- File (JSON, CSV, DBF…) - you configure “Export”
Map source tables/files
You could map, how input files/tables are transformed to output
Action buttons
- Run - runs defined import/export job
- Generate script - creates JavaScript code running defined job. You could run in it DbGate shell console, or you could export it to file and run it from command-line with nodejs
- Save - saves job for later
Import / export scripts
All import/export jobs in DbGate are at first transpiled into scripts. Follows example of exporting SQLite table into CSV.
// @require dbgate-plugin-sqlite
// @require dbgate-plugin-csv

const var1 = await dbgateApi.tableReader({
    "connection":{"engine":"sqlite@dbgate-plugin-sqlite","databaseFile":"/home/jena/test/chinook/Chinook.db"}
});
const var2 = await dbgatePluginCsv.shellApi.writer({"fileName":"Album.csv"});
await dbgateApi.copyStream(var1, var2);
You could also run this script without DbGate. Use context menu in script editor “Copy nodejs script”. It will copy following script:
const dbgateApi = require('dbgate-api');
dbgateApi.initializeApiEnvironment();
const dbgatePluginSqlite = require('dbgate-plugin-sqlite');
const dbgatePluginCsv = require('dbgate-plugin-csv');
dbgateApi.registerPlugins(dbgatePluginSqlite,dbgatePluginCsv);

require=null;
async function run() {

const var1 = await dbgateApi.tableReader({
    "connection":{"engine":"sqlite@dbgate-plugin-sqlite","databaseFile":"/home/jena/test/chinook/Chinook.db"}
});
const var2 = await dbgatePluginCsv.shellApi.writer({"fileName":"Album.csv"});
await dbgateApi.copyStream(var1, var2);


await dbgateApi.finalizer.run();
console.log('Finished job script');
}
dbgateApi.runScript(run);
After installing used dependencies in folder with script (all packages used in require() function):
yarn add dbgate-api
yarn add dbgate-plugin-sqlite
yarn add dbgate-plugin-csv
You could run this script with command:
node myExportScript.js